USDM Fiat 500 Abarth - TJET Swap and Standalone ECU Conversion
Disclaimer
This is a source of general information on the MultiAir -> TJet w/ EMU Black conversion for a US Spec Fiat 500 Abarth. By no means is it an extensive guide, and as I had to learn all of this as I went (there was no available information on this conversion at the time of writing), some topics are covered more extensively than others. As far as I am aware, at of the time of this conversions completion, it was the first one performed on a US Spec / MultiAir Fiat 500 Abarth. It is certainly the first well-documented one. I hope you can find this information of great use.
The switch to a standalone ECU allows you full control over every aspect of the powertrain. Sensors, injectors, ignition coils, turbos, intake manifolds, etc. can all be swapped to whatever you like, and be made to work with great ease - the hassle of dealing with an immensely complex OEM ECU is simply eliminated. With this great control comes great responsibility - with engines of this power density, it only takes a single poor judgment about a calibration decision to blow a hole through a piston. If you like to drive around without thinking twice about what your lambda may be under these new weather conditions, or if that latest tank of gas was really the octane you expected, and whether or not there's preignition going on a result, then this swap is not for you. If you do not have experience with automotive electronics, intensive engine work, and engine calibration, this swap is again likely not for you.
If you're rolling your eyes at this point and have the experience needed to allow this high level of control to result in the car performing how you envision it, and are willing to accept the potential downsides of the above in exchange for the potential to have a Fiat FIRE engine like few others in the world, perhaps this swap could be of benefit to you. In my opinion and experience, it is extremely rare that a stock powertrain converted to use a standalone ECU, and tuned by a typical “tuner”, will offer the same level of safety, drivability, self diagnosis, and emissions performance as the OEM ECU did. It may never run as it did stock - but depending on your priorities, the conversion can absolutely be worth it.
Regardless, I am not responsible for damage to yourself, your property, or others property as a result of you acting upon the information found here. I am a believer that any information that can be made available to all, should be. That leaves the responsibility upon you to use (or not use) it wisely. I’ll get off my soap box, but I’ve learned that this disclaimer is a must-have, so here it is.
With that out of the way...here we go:
The Electronics
Context
For this project, I decided to use an ECUMasters EMU Black. There wasn't much in the way of choice admittedly - as of now, there are only two standalone ECUs on the market, that I am aware of, that have Plug and Play support for the Fiat 500 (specifically the CAN implementation). One of them being a model from SCS Delta, and of course, the EMU Black (and Classic).
The plug and play adapter is indeed plug and play...for the car it is designed for, which is the Euro/Global market spec that uses a Bosch ME7.9.10. Our US spec cars, which use a Marelli8GMx, have quite a lot of differences under the hood, with changes to the: EVAP system, diverter valve, Oxygen sensor(s), the inclusion of MultiAir (and thus the power and gnd to the four, high current solenoids), and a couple other systems.
The different requirements of the US spec car, along with the use of an entirely unrelated ECU family, meant that Fiat had to change the pinout of the factory harness. Thankfully, however, the connector is the same - a variant of the TE284617. This means that, for the most part, the *cars original* harness can be easily repined. I hoped that there would be a way to modify the pinout of the PnP adapter itself, but this proved near impossible given the design.
As it stands, and without me (or someone) making a PnP adapter, modification to the cars wiring harnesses is very difficult to avoid. Personally, I didn't have the time to come up with a solution to that, and decided the harness would just be a casualty of attempting to pioneer something like this.
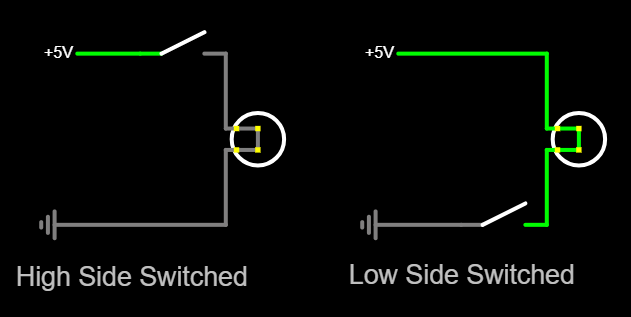
As "high side switched" and "low side switched" are common descriptions in the following section, I figure it would be helpful to cover what exactly that means beforehand. With a low side switched configuration, the component is always connected to 12V (though in most cases, there's an additional main relay which disconnects power to all low side switched components whenever the car is in a fully shut down state). In order to enable the device in this case, its ground is connected to...ground, thus completing the circuit and powering the device. This is how the fuel injectors work, for example. In the high side switch configuration, the device is always grounded, and is controlled on the "high side" by connecting power to it when it needs to function. Neither one of these two control methods is better than the other per se, but depending on the application, one may be advantageous from a circuit, component, and ECU/Control Module design standpoint - particularly when dealing with inductive loads.
Fundamental Differences
Lets get the worst part out of the way first. While many incompatibilities due to the PNP adapters intended application can be dealt with by simply repinning, for some components, this is not the case, and further work (usually elsewhere in the harness) will be required.
The Lambda sensor (Upstream Wideband Oxygen Sensor) is a part of the C2 connector on the T-jet model, whereas it is on the C1 connector for USA spec cars. A jumper of some form could be used, but you are at the mercy of the pinout of the PnP adapter - and it is possible the PnP adapter is made for a narrow band sensor (some documentation points to this). I suggest wiring the Lambda sensor directly to the EMU Black itself, in this instance. Ecumaster provides pretty good documentation on this, so I won't elaborate here. I do not know anything about the OEM sensor, so especially if your car has some miles on it, I highly recommend getting a new Bosch LSU4.9 sensor. These can be found for many applications nowadays. For most applications, the sensor retails for around $100 (Bosch PN 0 258 017 098). You will need to buy a LSU4.9 connector online, as you must retain the connector end of the LSU4.9 sensor - it contains a calibration resistor strip - so do not cut the sensor wiring as a method of connecting it to the EMU.
The diverter valve is wired differently on the T-jet model. However, this proves to be a non issue for one major reason: since MultiAir being removed or made passive is a needed part of this swap, you don't really end up needing electronic control anyway - and to be honest, the crude DIY control strategy you'd have to implement would certainly be worse than a purely pneumatic valve. Since the engine will now be traditionally throttled, you can simply buy a pneumatic diverter valve (such as the commonly available option from Forge) and hook its single hose connection straight to the inlet manifold. No valves, no solenoids, no wires. Just air, and it works almost as well as the OEM ECUs control strategy provided the correct spring is used.
The starter interlock relay, which is a physical means of preventing the engagement of the starter if the clutch has not triggered the downstop switch, is switched on the high side by the Marelli ECU, and seemingly on the low side by the Bosch ECU (and thus this PnP adapter). This can be resolved in a number of ways: the interlock function can be removed by powering the relay any time the ignition switch is on, the respective pins in the fuse panel can be bridged, or an H bridge output can be used to power it directly (and the interlock function can be maintained provided the ECU receives input from the clutch switch).
The wiring of the brake, clutch, and reverse switches is a little messed up, at least it seems that way. In the US spec car, all three of the aforementioned switches operate at 12v. I thought that perhaps this is just because they were floating, but neither of the pulldown options made a difference for me. The EMU Black can support up to 12v on the analog inputs- though it will not read anything over 5v. The switch inputs, which are used by default, are not designed to be given power at all - they are supposed to be switched by closing a circuit to GND. Failure to repin this could lead to damage of your ECU. My solution for the reverse switch was to re-wire the reverse switch to go GND > REV SW > EMU Switch Input rather than the factory configuration 12V > REV SW > EMU Switch Input. This works just fine. For the brake and clutch pedal switches, I connected the signal wire (which, remember, operates at 12v) to free analog inputs, with an inline resistor for each. Combining this resistor with the pulldown setting in the EMU black creates a voltage divider and, with the resistors I used, pulls the voltage to around 4v. Additionally, sending 12v to an Analog Input Pin does create a slight deviation of the EMUs sensing circuitry voltage, which I am not really happy with, hence me adding a resistor inline for the brake switch. EDIT: In the latest beta firmware for the EMU Black, brake switch via CAN is being added, which frees up the input previously needed for the brake pedal.
The After Run Coolant pump is switched by grounding a single wire in the C1 (body side) connector. Grounding this pin completes the circuit through the coil side of the relay (low side switching), which is hot at all times, to allow the pump to run whenever the ECU requests. One of the EMU's AUX outputs should be used in this case, as those are for low side switching. In order to run this pump after shutdown with the EMU Black, the delayed shut-down function should be enabled, with logic (using Virtual Parameter Outputs, and Parametric Outputs) to control the run conditions, and thus when to keep the ECU awake. At some point, I will attach screenshots of how to do this, but it's not too difficult IMO. There are more complex things to deal with first.
The ECU/EMU power input pins are a bit..wrong. As the PnP adapter comes, the high current capacity, ignition switched supply from the body harness is connected to the 12V ignition pin on the EMU black, which is not used as a main power feed in the EMU - it is simply an ignition status input to tell the ECU to turn on/wake up, and thus the pin on the EMU is small. Additionally, the cars 12V ignition signal (used to wake up the factory ecu) is connected to the EMUs main power feed, which is also just wrong. To avoid this mess, I have used the cars 12V ignition switched signal, bypassed the PnP adapter, and routed that directly to pin G18 (ign 12v) on the EMU. For the main power feed, I again bypassed the EMU Black and got the power directly from the batteries ve+ terminal. You should absolutely use a fuse as close to the battery terminal as possible if you choose to go this route. I am sure there are other solutions, perhaps some more elegant, but this is what I did. If you find something better, please share, and Ill be sure to update this page.
The Electronics - Wiring Diagrams, Pinouts, etc
Essentially, for the most part, you'll be disassembling the two connectors which plug into the OEM ECU, disengaging pins, and moving them to other areas of the connector. For the overwhelming majority of the pins you'll be moving, they'll simply slot right in at the new location. There are a handful of exceptions however - some pins you'll be moving need to go to a location which utilize a different sized spade. In this case you can cut and splice the wires as needed, use a donor harness for excess spades and splice those in, or simply buy the correct spades for the TE284617.
Be wary that the 500 Abarth Plug and Play adapter manual you can find online through ECUMaster is not up to date - it is for the older version of the PnP adapter made for the EMU Classic. While some things are the same, or very close, there are a few differences. The documentation which comes with the PnP adapter for the EMU black should be correct and up to date.
Additionally: do NOT blindly connect wires to where you think they should go based on a diagram. There are discrepancies in the EMU documentation as I mentioned above, and there are also errors in fiats own wiring diagram - at least in the service manual I have. I guess it wouldn't be a fiat if the documentation was correct.
Please use the following as nothing more than a general guide. Always check, double check, and triple check every connection before proceeding. I am not responsible for damage to your car, yourself, or the EMU black, all of which are very possible. The following spreadsheet needs some polishing, and some edits, which I will be doing in the future as I have time. The rows highlighted are those which you should look at with the most skepticism, as there is either a discrepancy, or incompatibility requiring work beyond simply moving a wire around.
For now, I must approve anyone who tries to access this document. Once I have a higher level of confidence in its correctness, it will be open to all, but for now I would like to ensure I talk to and warn each person who would like to use it.
Combined OEM ECU and EMU+PNP Pinout Sheet
https://docs.google.com/spreadsheets/d/1OC6R-kx5jToImxXRtPxPB29olWXmCCdy5MaccLEAFsg/edit?usp=sharing
2013 Fiat 500 Abarth OEM ECU Pinout Sheet:
https://docs.google.com/spreadsheets/d/e/2PACX-1vRIPOXT0sZTI6uKkRuEvHEYEISrkf-arfFKYFQaZAnAhN_8Gemab-Gm16oZ_dsmkHdBocr3q5TcLxEe/pubhtml
Also useful - for the components which need to be wired directly to the EMU. EMU Black Pinout (from ECUMasters site)
EDIT: I personally would never consider beginning this swap without a full electrical manual from the factory service manual. There was a LOT of ambiguity from many sources - the EMU PnP manual, and the factory service manual included. As a result, many things had to be changed as I was working, and may not have been documented. Its quite a tedious process, be warned.
Engine Modifications / MultiAir to TJET Conversion
The engine modification portion of this swap is extremely straightforward. It's almost like Fiat developed these valvetrain systems to be modular, and allow streamlined production of many variations of the FIRE engines... (They did). There is a single incompatibility, but thankfully dealing with this is trivial.
Essentially, we are removing everything above the cylinder head, and swapping on the upper head/camshaft carrier from a Tjet model. That’s pretty much it, and as a result, this is as apart as the engine has to become:
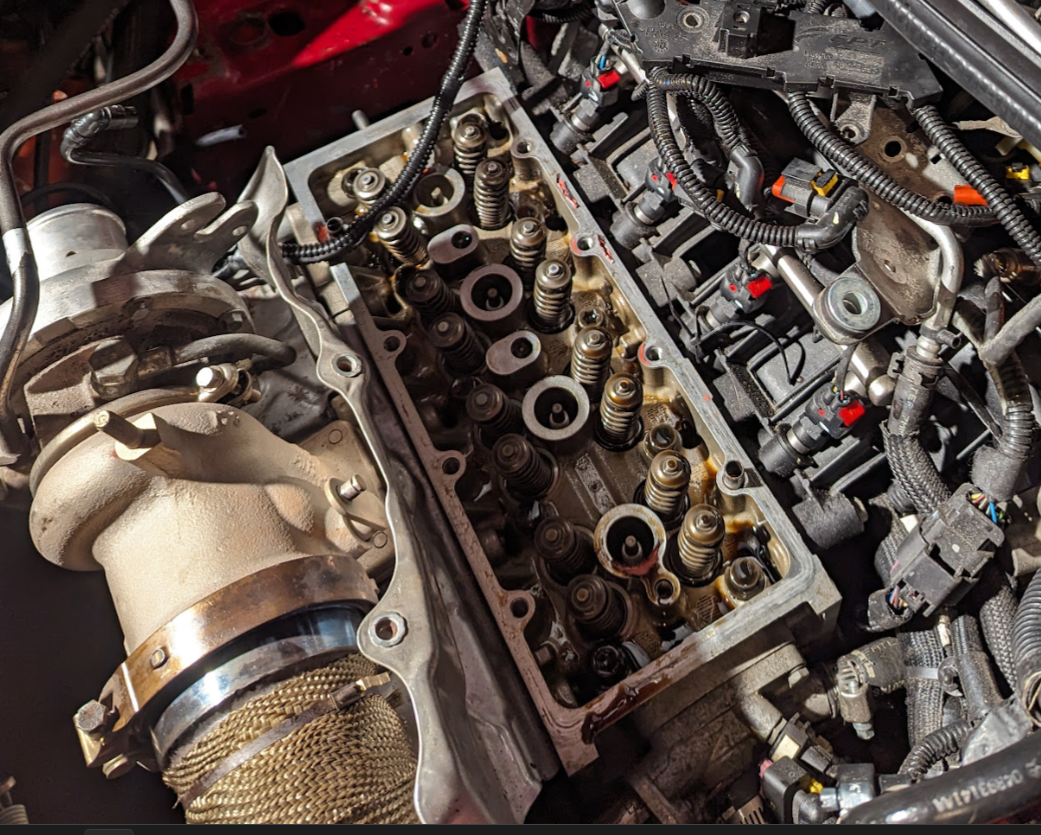
The engine in the most disassembled state required of this swap. See, its not that bad, is it?
The single incompatibility comes from an additional oiling port added to the cylinder heads meant to be paired with the MultiAir system. As you can imagine, given the above mention of streamlined manufacturing, the only difference is a single hole drilled through to one of the head bolt wells, which isn't drilled on TJET models.
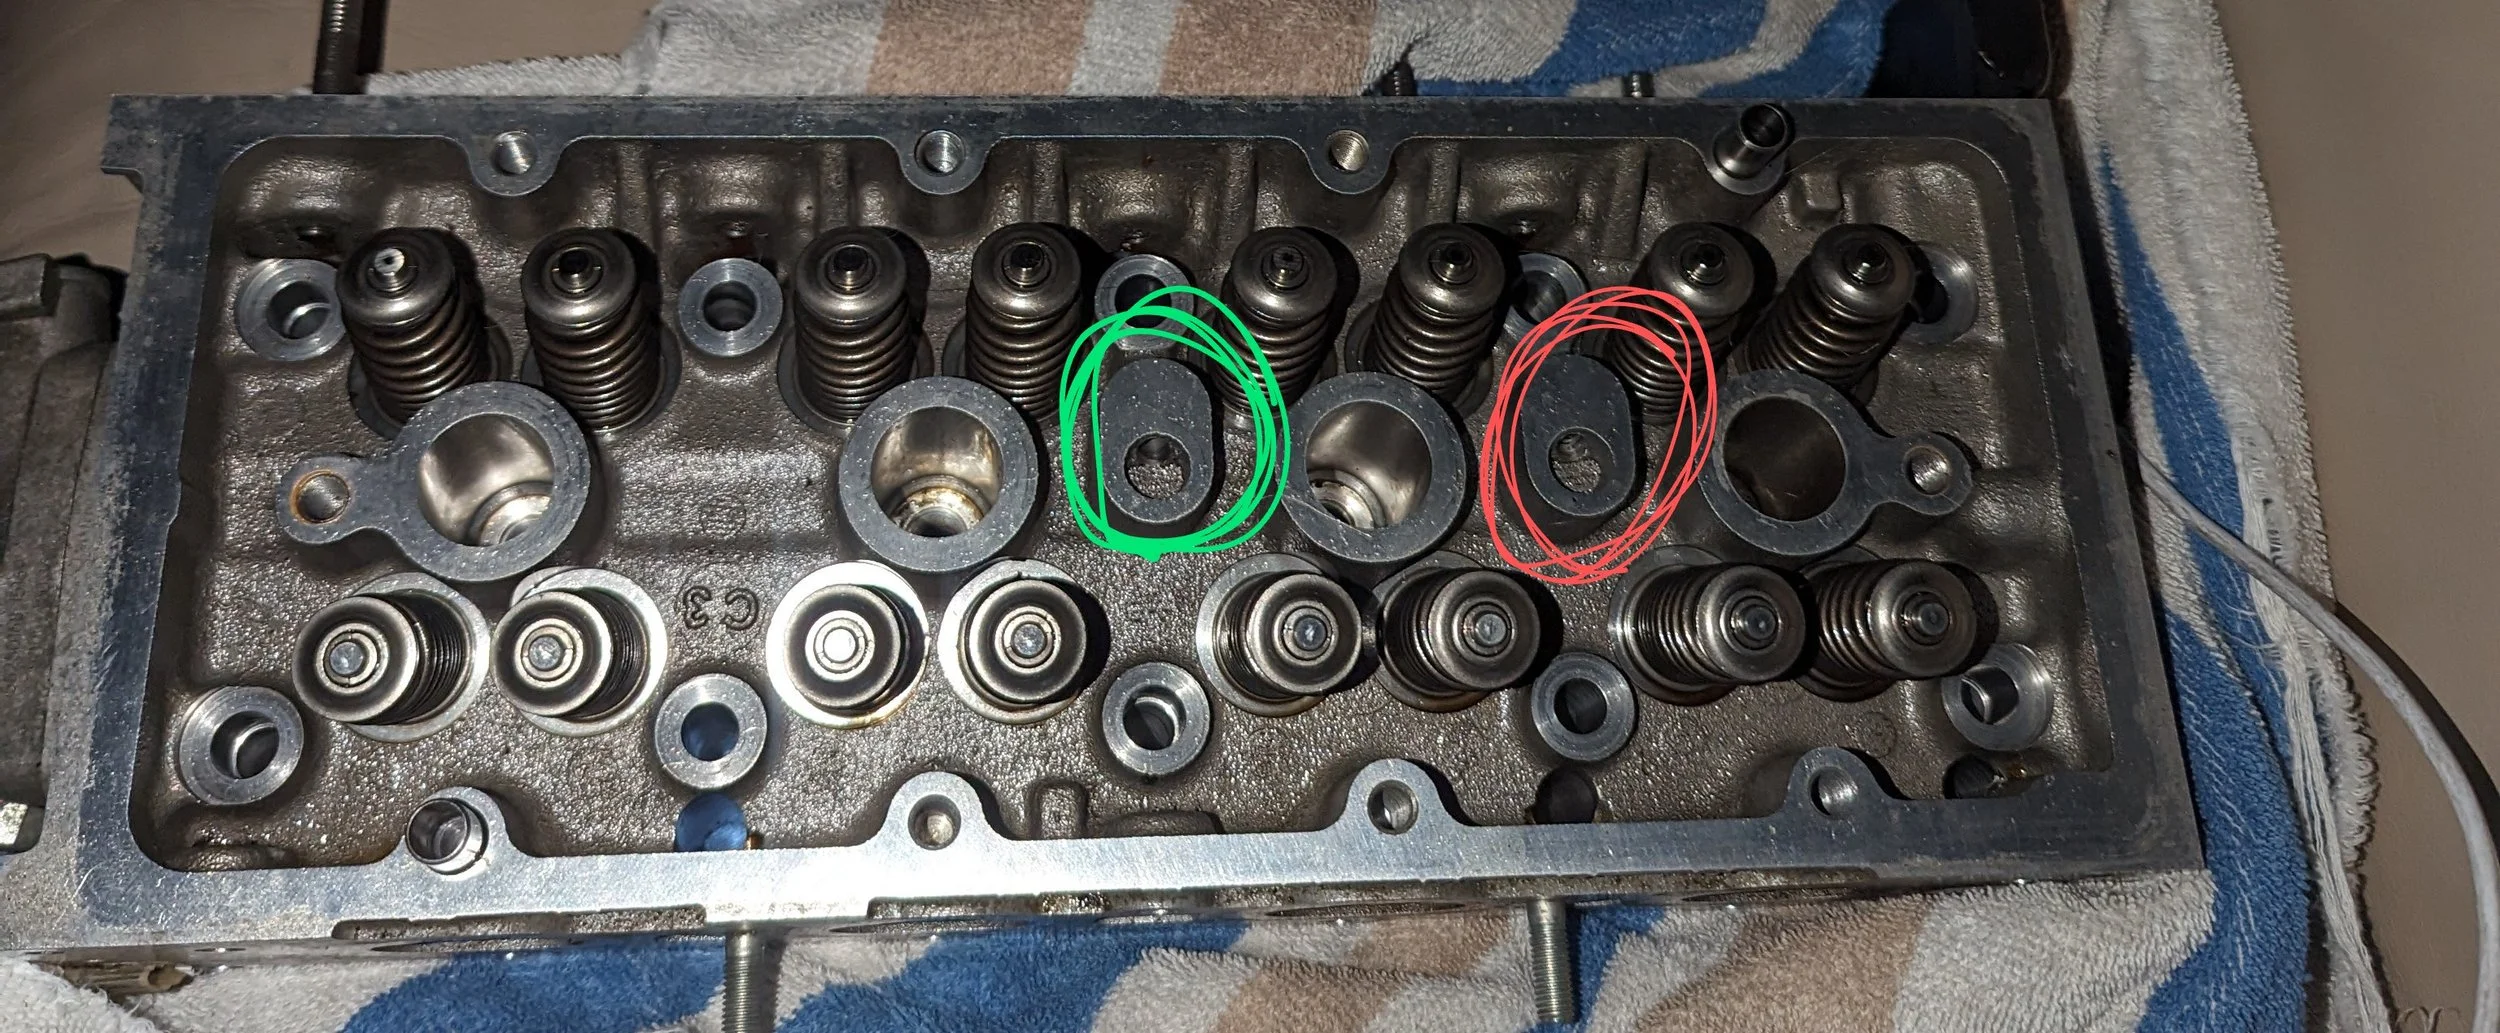
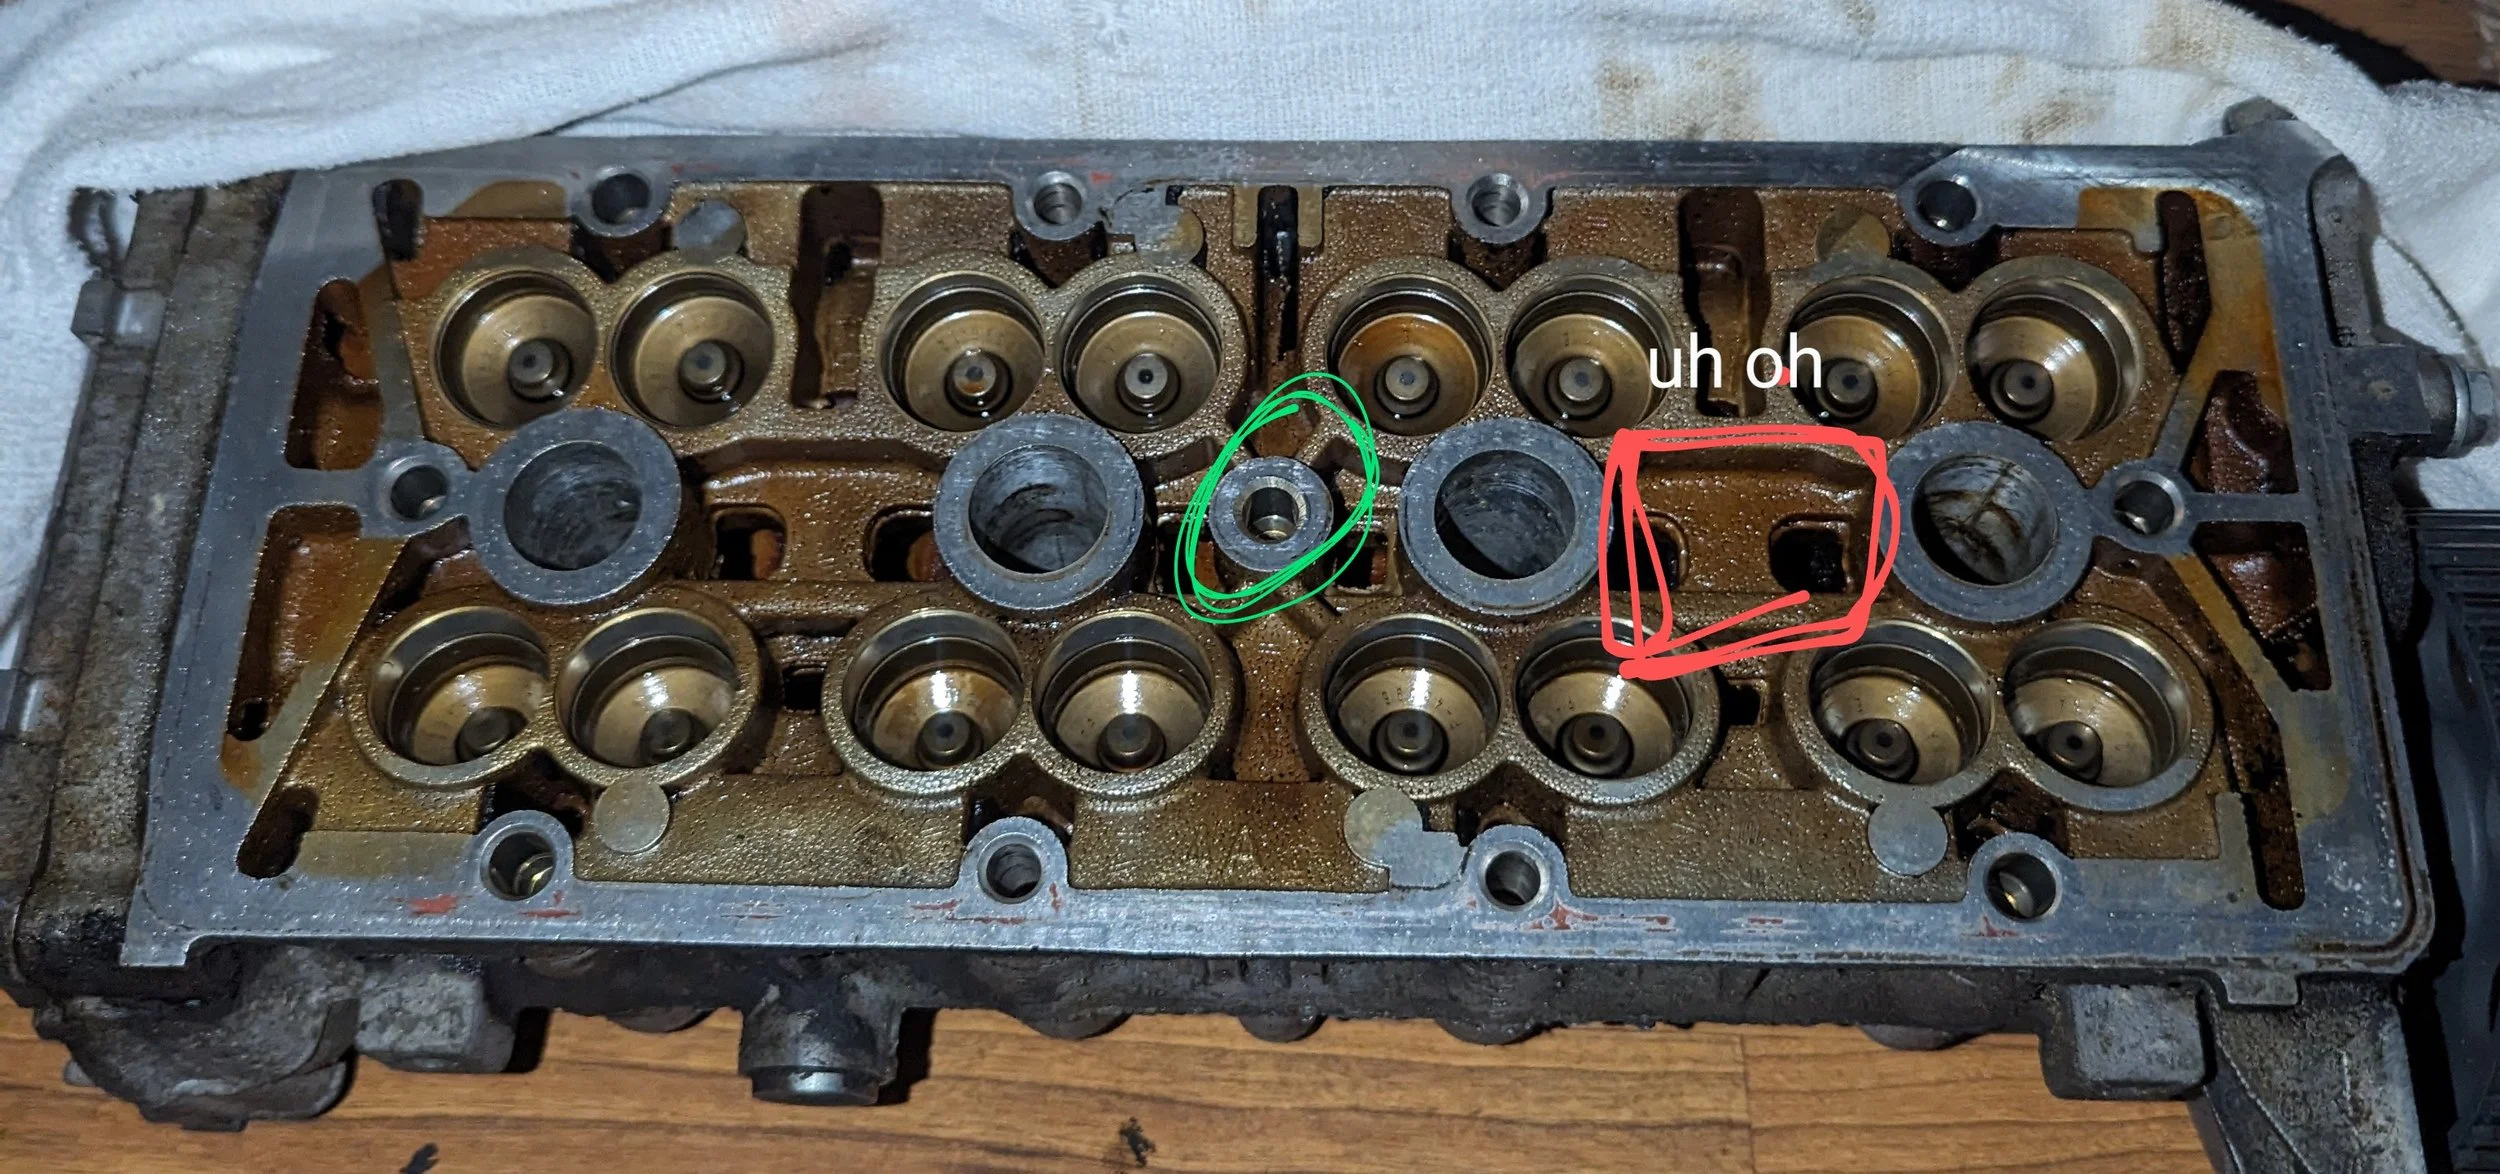
A side by side look at the USDM MultiAir cylinder head, and the Euro TJET cam carrier. Notice that the cylinder head has an additional oil feed port (circled in red) which has no corresponding interface on the TJET carrier. Without being plugged, that would certainly lead to quite the disaster.
It appears that Fiat went through quite a few revisions of this differentiation over the years, with some TJET blocks lacking the feed port entirely, some head gaskets lacking the hole to allow oil to flow to the not needed port on the cam carrier, and some cam carriers missing the hole entirely. Thankfully for us, it's easier to plug an oil port than it is to drill a new one in this application.
The route I decided on involves drilling out the existing oiling port slightly, and tapping it for a 5/16 set screw. By 3D printing a plug, I was able to prevent debris from falling into the engines oil galley, preventing mechanical carnage from following the conversion. The length of set screw used does not really matter. In my case, it was likely a little under double the 5/16 thread diameter, but using two shorter ones in a jamb-nut configuration is likely a reasonable option too. Red Loctite was used to seal and retain the plug. There are better sealant options, but this is what I used.
The actual process of swapping the cam carriers is no different than what you'd do in the process of replacing the cam carrier on a MultiAir model. Once the valve cover is removed, you then remove the MultiAir, followed by the cam carrier. At that point it is as simple as applying engine assembly lube to all cam lobes, installing your NEW, OEM (INA) lifters into the carrier, and installing the carrier onto the engine. Of course, you will want to replace the gasket. Before pulling anything apart, ensure that you have the needed ten (10) M16*1.0 threaded plugs which seal up the access ports for the bolts which hold the carrier to the cylinder head. They are hard to find (nearly impossible in the US), and will likely take a significant amount of time to get if you do not have them. I had to order mine from Europe. At this point, you are done - as the TJET carrier is a one piece unit, there is no valve cover. If you do not have the upper timing belt cover (it is different than the cover for the MultiAir unit), you will want to order one of these from Europe as well. For lifters, you can buy a full set of sixteen INA (OEM) lifters for less than $300, as opposed to the over $600 if buying from Mopar here in the states. Part numbers are available in my parts number document *here* (not linked yet).
Follow good maintenance practices in this process, at a bare minimum you'll want to replace the carrier gasket, timing belt, and timing belt tensioner.
Tuning/Calibration
Experience (or lack thereof) with engine calibration should be a large part of the decision on whether or not this standalone ecu option makes sense for your uses. Please be warned, a single mis-click or poorly judged calibration decision can destroy your engine faster than you can blink.
Initial Notes
ECUMasters provides a basemap for the Abarth's 1.4TJet...however, despite your engine being functionally identical to a GT1446 equipped TJet at this point, there are differences elsewhere which means that this basemap is not suitable for use beyond running the car initially and beginning to re-tune as needed.
The primary difference which is relevant at this point is the fuel system. The European market 500 Abarth uses a return-based, constant differential pressure fuel system - while the US spec car uses a much more modern, constant pressure based system with no return. Whether or not you should change the associated fueling settings is entirely dependent on your future plans with your car.
Base Map
From the beginning, I wanted to be able to release a more suitable basemap for an otherwise stock US Spec Abarth/500t, and as such, I initially built a basemap around the stock fuel injectors. If fuel flow data was known, the tune would not need to be altered when switching to different injectors, but since this is not the case, un-observable errors in the fueling model are simply being accounted for in the Volumetric Efficiency table. This is not ideal - but it was never meant to be: it's a means to give you access to a more suitable basemap. This does not mean it is perfect, and I am not responsible if (when) your engine blows up if you use it blindly. There are notable issues with the idle going lean to some degree after it heat soaks, and the cold start idle being quite rich. Additionally, the ignition angle map was tuned without the required resources to do it properly, and may be too conservative in some areas (to the point that EGTS may be of concern), and too aggressive in other areas. Again, please use this as a starting point only - I am no longer developing this tune as I have switched to different injectors.
Please note that this basemap is for EMU Black V2 Firmware. Nowadays (almost a year later), ECUMasters has released a new firmware version, V3. There are a substantial number of improvements which have been made, but as a result, a lot of re-configuration must be done. Additionally, a few Fiat 500 specific things in V3 firmware are still a work in progress, and as a result the CAN implementation is not as OEM as V2.
A few of the known issues:
There is no fuel pressure sensor on the US spec car, so a roundabout method is used in order to make the fuel model behave at least somewhat intuitively without this information, or support for constant rail pressure systems.
The DFPR correction table is entirely wrong, but it was done in order to improve other areas of the tune.
Some regions of the VE table may be excessively rich or lean - depending on current ambient and engine bay conditions.
The ignition timing table is extremely conservative in some regions.
File:Stock injector basemap 004.zip
Volumetric Efficiency
Tuning VE on this platform is pretty straightforward - I would say it has been one of the easier platforms I have tuned, especially when you make good use of the EMU Blacks data analysis features.
Problem spots in the ultra low load regime are likely due to injector behavior, but thankfully this can be minimally intrusive with a well dialed in deceleration fuel cutoff.
Boost Control
Once you feel that your fueling/VE is well sorted in the low load range (sub 160kpa), it's likely safe to begin dialing in your boost control. The stock turbo is quite impressive in the midrange, capable of over 25psi before efficiency takes an absolute crap. For the higher rpm range, especially above 5500 rpm, trying to achieve high boost levels will leave you with extreme EGTs, a very unhappy turbo, and a slow car. It is best to taper off boost to as low as 10 psi and optimize your ignition timing to get the most high end power you can out of it.
Despite the seemingly complex nature of electropneumatic boost control, It's actually quite nice to work with on this platform. A given WGDC (wastegate solenoid duty cycle) tends to correlate with a given boost level, until about 5500 rpm where the compressor efficiency, and the exhaust manifold air pressure begin to cause boost to trend downwards. To a degree, you'll want to compensate for this in the WGDC reference table, but care must be taken to not push the turbo too far outside its optimal range.
The general idea of the closed loop boost control strategy on the EMU Black is as follows, and works well on this platform.
1. Set boost control strategy to "Open Loop". This will allow you to tune your WGDC reference table, free of interreference from PID control. Turn off all proportional corrections as well.
2. Set the X axis of the WGDC Reference table to 'Boost Target'. This is important if you want to be able to adjust your boost target without having to re tune the entire control loop.
3. Set your WGDC Reference table to various values and correlate WGDC values across the RPM range to a MAP (ensure this is done with the throttle fully open).
4. Now use the collected data to input values into your WGDC Ref table (X axis boost target, Y axis RPM). For example, if you do a 50% WGDC ramp run and see that 50% WGDC correlates to 240KPA at 4500RPM, you'll want to enter 50% in the 240kPa @ 4500RPM cell. Do this for the remainder of the table.
5. Now you should be able to set a boost target in your "Boost Target" table, and it should roughly track with the values you enter as your target. Do not try to set a high boost target at low throttle openings. You'll waste energy, stress the turbo, and produce excess heat.
6. Now enable closed loop control and tune the PID loop until it compensates for changing conditions as well as you prefer. This will take some drive time for sure.
Cost Report
EMU Black: $1200
PnP Adapter: $300 (on sale for $150) The reason for the significant cost discrepancy between this PnP adapter and ones for the ME7.9.10 implementation is that there are no active components needed in the installation of the EMU Black, as opposed to the Bosch ECU.
OEM/INA Lifters (16x):~$220 from Europe. Don't buy them from Mopar at a cost of $47 a piece. They are made by INA, and available much cheaper.
TJET Cam Carrier w/ Camshafts: ~$300 from Europe.
Timing Belt Kit: same as usual cost, same parts as the MultiAir spec
Cam Carrier Gasket: same as usual cost, same parts as the MultiAir spec (a hole could potentially be different but it's irrelevant as you'll have blocked it off anyway)